 "day 4" -tim holtz(c) 2008
supplies: craft sheet, sticky back canvas, matte multi-medium, paint brush, distress ink/black soot, old paper, frayed burlap, fired brick, ink blending tool, mini mister (ranger); numerals, stencil type, long fasteners, washers, texture hammer, sanding grip (tim holtz idea-ology); scissors, paper distresser (tonic); stamps/december J1-1244, definitions K4-1251 (stampers anonymous); prima flowers, dymo, tags, ribbon, film strip, star, stapler, music paper
step 1: determine size of tag or layout you’re working on and size photo on your computer to fit project. print photo on sticky back canvas – YES you can run sticky back canvas through most printers: laser, toner, ink jet (that’s right! even ink jet works great with this and the inks will not bleed at all on the canvas). you can print your photo in black and white, sepia of color for this technique.
step 2: cut printed image out using non-stick scissors.
step 3: peel off backing of sticky back.
step 4: place canvas face down (adhesive side up) on craft sheet and place tag in center.
step 5: trim off excess canvas using non-stick scissors.
step 6: punch hole back through tag with hole punch.
step 7: ink the edges of your "canvas" tag with black soot distress ink using ink blending tool. (*i love this look of a photo on canvas. sticky back is great since it allows you to have a canvas surface on things like tags, cards, scrapbook pages, boxes, and other home decor item – endless possibilities!)
step 8: using dymo label maker, create words for your tag. this can be names, dates, whatever…
step 9: cut words apart with scissors, remove backing and adhere directly to the canvas tag.
step 10: position a piece of film strip (from those old 8mm movies) and secure to tag with staples.
step 11: brush a small amount of multi-medium on to back of star.
step 12: press down to adhere to tag. (*multi-medium can be used as an adhesive for all types of objects – this is a fast drying medium with excellent adhesive qualities.)
step 13: stamp december stamp on to another tag or piece of cardstock.
step 14: cut out image.
step 15: ink image with old paper distress ink using ink blending tool. (*you can also use darker colors of distress ink on the edges.)
step 16: drag paper distresser along the edges to create a tattered look.
step 17: for added dimension, bend and curl up corners.
step 18: secure to tag using stapler.
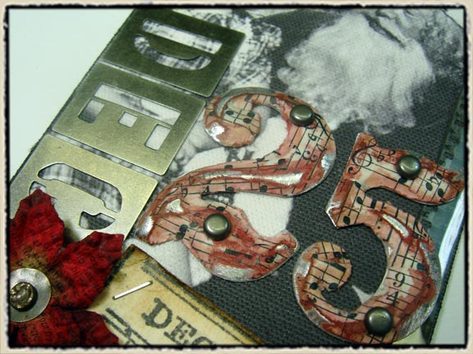
step 19: gather the following supplies for this next step since working quickly is key: numerals "2" and "5", multi-medium, paint brush, music paper torn into strips. (*as much as i like using the numerals as-is, this techinque achieves cool results!)
step 20: working on your craft sheet, brush a layer of multi-medium on to one of the numerals.
step 21: while medium is wet, press pieces of vintage papers over the multi-medium forming paper around curved edges with your finger.
step 22: apply more multi-medium and continue to add more papers until entire numeral is covered. brush a light layer over the top of the entire piece. (*working on a non-stick craft sheet is key for this step!)
step 23: repeat above steps for the other numeral.
step 24: allow pieces to dry or dry with heat tool.
step 25: trim off excess paper with scissors or craft knife around numeral.
step 26: use your fingers to get into any tight areas and form paper around the back of the numeral.
step 27: using sanding grip, sand and scuff over the numerals to remove some of the paper and expose the metal for grungy distressed look. (*i use the sanding grip because it allows me to sand just the top surface and not rip off all of the paper.)
step 28: ink over the numerals with frayed burlap distress ink using ink blending tool.
step 29: ink over numerals again with fired brick distress ink using ink blending tool.
step 30: mist over numerals with water form mini mister and blot with cloth. (*notice how the inks only adhere to the edges where you sanded since the metal and multi-medium resists the distress ink – cool effect!)
step 31: secure to tag with long fasteners.
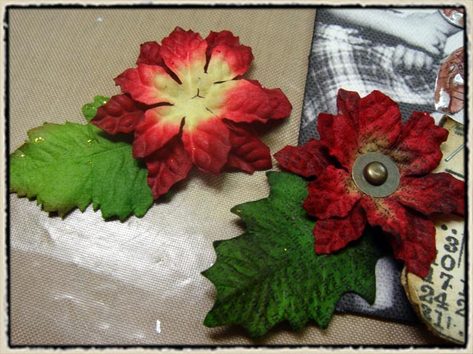
step 32: stamp prima flowers with black soot distress ink using definitions stamp.
step 33: place long fastener through washer. (*this will keep the brad from going through the center of the flowers.)
step 34: insert fastener through flowers and holly and secure to tag.
step 35: using bump tip of texture hammer, place tag on hammer mat and tap the head of the brad with the hammer to create dents in the brad and give it a time worn look – love the hammer here’s a video on how to use it – so cool!)
step 36: adhere stencil type to tag with multi-medium and let dry.
*in the details – look how great the tattered numerals with the torn papers, and the stamped flowers with the texture hammered brad add to this tag!


