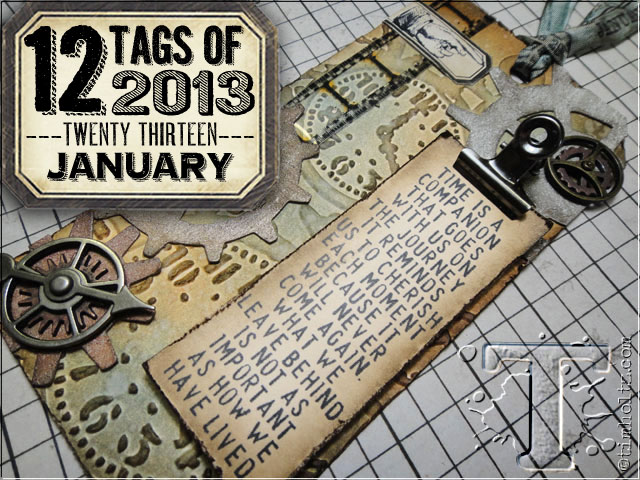
are you ready to start another creative year together? are you ready to explore new products? share new techniques? i definitely am… in fact, i couldn’t “officially” wait for 2013 to begin to start the 12 tags of 2013. so consider this a creative jump start of inspiration for the new year! i truly thank you all for the support you continue to show, and i’m so blessed that i get to do what i love to do for a living. not a day goes by that i don’t realize and appreciate that all of you make it possible for me to continue to live my dream – thank you once again. as we all get ready to ring in the new year, set new goals and challenges, i want to make sure and do my part by continuing to share inspiration right here on my blog. i have a feeling 2013 is going to be another creative year, and i look forward to continue to enjoy the journey with each of you…

supplies: distress stains/metallics, distress ink/iced spruce/stormy sky/rusty hinge/walnut stain, ink blending tool, craft sheet, mister, heat tool, glossy accents, jet black archival ink, 1/8″ wonder tape, #8 manila tag; grungepaper, vial label, crinkle ribbon, film strip ribbon, hinge clip, sprocket gears, mini gears, game spinner, mini fasteners, sanding grip; clock & steampunk texture fade, gadget gears bigz; CMS034, CMS038, CMS120; scissors, paper distresser
 step 1: this is something i’ve shared before, and if you’ve yet to try it, i encourage you to. simply place your embossing folder on a cutting mat, and using a craft knife, cut a slit on the fold leaving about 1/2″ on each end sealed.
 step 2: this will allow you to place a #8 tag through the slot to emboss the bottom of the tag. this is also cool for doing continuous embossing like on a 12″ strip of paper for a scrapbook border and even on ribbon.
 step 3: emboss the manila tag using your vagabond or other embossing machine.
 step 4: ink the tag with various colors of distress ink using an ink blending tool.
 step 5: i prefer to layer colors so as i am inking, i just ink various areas of the tag.
 step 6: add depth by using different tones of colors (for this tag i started with iced spruce, and now layered with stormy sky).
 step 7: for the final layer, ink around the edges of the tag with a dark color (i used walnut stain) also lightly swipe the blending tool over the embossed design to make it seem more dimensional.
 step 8: splatter water droplets on to inked tag using a mister or your fingers, but we want droplets and not mist.
 step 9: dry tag with heat tool to create a splatter effect on your tag.
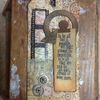
 step 10: die cut gadget gears from grungepaper.
 step 11: ink gear with metallic distress stains – this is fast.
 step 12: use various colors of metallic stains on gears and let dry.
 step 13: scuff gears with sanding grip around edges.
 step 14: ink scuffed grunge with distress ink using ink blending tool to antique.
 step 15: adhere gears over the edge of the tag using glossy accents. hold in place to dry over embossed surface.
 step 16: flip tag over and trim excess grunge up to the edge of the tag.
 step 17: repeat previous steps for other gears.
 step 18: cut a piece of film strip ribbon and apply 1/8″ wonder tape to each edge. (*this skinny 1/8″ double stick tape is the best way to adhere film strip ribbon if you don’t want to staple through it with the tiny attacher. using liquid adhesive takes a long time for it to dry and stick.)
 step 19: remove red lining from tape.
 step 20: slide one end under gear and adhere to tag. trim excess film strip if needed.
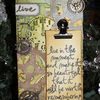
 step 21: stamp text on to a piece of manila (i just used a spare tag).
 step 22: cut to size, distress edges with paper distresser, and ink edges with distress ink using ink blending tool.
 step 23: apply pop-it foam tape to back of stamped text and add a hinge clip to the top.
 step 24: secure to the side edge of the tag as shown.
 step 25: cut a piece of crinkle ribbon and stamp text with archival ink.
 step 26: heat dry image immediately as you stamp to avoid the ink bleeding into the ribbon as it dries.
 step 27: continue stamping ribbon, drying each time, until desired look is achieved.
 step 28: stain ribbon with distress stain.
 step 29: dry ribbon flat – no crinkling this time can you believe it? well we want to see the image don’t we?
 step 30: tie custom ribbon through tag…cool huh.
 step 31: stamp finger on to vial label with archival ink and heat dry it.
 step 32: adhere to tag over film strip ribbon.
 step 33: sometimes i like to combine the sprocket gears with the mini gears. if you can’t layer them with a fastener, then just adhere them together first with a little glossy accents.
 step 34: secure various gears and a game spinner to tag to embellish and that’s it.
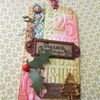
 the details: that stamped and custom colored crinkle ribbon just adds the perfect touch to this tag. i can see myself doing this more and more on my projects.
 the details: combining an embossing folder, dies cuts, and metal embellishments creates a variety of layers and textures.
i thought the quote on this month’s tag was such a great reminder to ourselves to not only take the time, but think of the impact time has on our lives. even though sometimes life may seem a little chaotic, just take it all in, cherish it, and most importantly live it to the fullest. here’s to a new year filled with creativity, love, understanding, and most importantly peace – happy new year everyone…t!m
*winners for the december 2012 tag will be announced in tomorrow’s post since the deadline for submitting isn’t until midnight tonight.
*be sure to check your local stores for these supplies or you can
click the links below to purchase online…
(SSS=simon says stamp / IE=inspiration emporium)
GREAT NEWS! both of these online stores are offering a discount of 10% off your purchase – use the following codes with your order:
(SSS code: JANSAVE10 / IE code: timtime)
|
|
|
|
|
|
|
|
|
|
|
|
|
|
|
|
|
|
|
|
|
|
|
|
|
|
|
|
|
|
|
|
|
|
|
UPLOAD YOUR PROJECT: here's the place to share your own project
inspired by this month's "12 tags of 2013" right here on my blog!
To Get Started:
1. clik on the (add your link) button at the bottom of the post.
2. after you enter your info, click (next step) and you'll be able to
select the photo you wish to display.
*note: you may link from your blog or from a public hosting site.
please only post your project photo relating to this month's tag.
 |  |  |  |
 |  |  |  |
 |  |  |  |
 |  |  |  |
 |  |  |  |
 |  |  |  |
 |  |  |  |
 |  |  |  |
 |  |  |  |
 |  |  |  |
 |  |  |  |
 |  |  |  |
 |  |  |  |
 |  |  |  |
 |  |  |  |
 |  |  |  |
 |  |  |  |
 |  |  |  |
 |  |  |  |
 |  |  |  |
 |  |  |  |
 |  |  |  |
 |  |  |  |
 |  |  |  |
 |  |  |  |
 |  |  |  |
 |  |  |  |
 |  |  |  |
 |  |  |  |
 |  |  |  |
 |  |  |  |
 |  |  |  |
 |  |  |  |
 |  |  |  |
 |  |  |  |
 |  |  |  |
 |  |  |  |
 |  |  |  |
 |  |  |  |
 |  |  |  |
 |  |  |  |
 |  |  |  |
 |  |  |  |
 |  |  |  |
 |  |  |  |
 |  |  |  |
 |  |  |  |
 |  |  |  |
 |  |  |  |
 |  |  |  |
 |  |  |  |
 |  |  |  |
 |  |  |  |
 |  |  |  |
 |  |  |  |
 |  |  |  |
 |  |  |  |
 |  |  |  |
 |  |  |  |
 |  |  |  |
 |  |  |  |
 |  |  |  |
 |  |  |  |
 |  |  |  |
 |  |  |  |
 |  |  |  |
 |  |  |  |
 |  |  |  |
 |  |  |  |
 |  |  |  |
 |  |  |  |
 |  |  |  |
 |  |  |  |
 |  |  |  |
 |  |  |  |
 |  |  |  |
 |  |  |  |
 |  |  |  |
 |  |  |  |
 |  |  |  |
 |  |  |  |
 |  |  |  |
 |  |  |  |
 |


