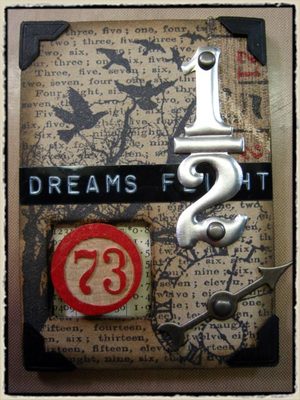
"may technique challenge" – tim holtz(c) 2008
supplies: craft sheet, distress inks/brushed corduroy, ink blending tool, glossy accents (ranger); scissors, craft knife (tonic studios); cutting mat; foam board or fun-foam; favorite adhesive; favorite scrapbook paper; found object
step 1: select the found object to "embed" and place it on to a piece of foam board already cut to the size of your project (layout, atc, or card). *tip: i prefer using foam board because i think it’s more durable and rigid.
step 2: trace around the object leaving as much space as you want around it for a border. *tip: of course it’s easier to use a ruler and draw a square or rectangle around an object to cut instead of sticking with the actual shape.
step 3: remove the object and place the foam board on to a cutting mat. using a craft knife, begin cutting the foam board following the lines you traced. *tip: it’s important to cut the foam board in layers instead of trying to cut all the way through it in one stroke so make sure you have a sharp blade.(i love my retractable craft knife from tonic it’s so simple to use!) *tip: i prefer using a glass cutting mat because the glass allows the blade to slide when cutting.
step 4: when you get to a corner, be sure to cut past the marks so all corners intersect (this will help you remove the piece you are cutting out).
step 5: continue until all of your areas are cut and remove the piece from the sheet – this will be referred to as a "niche". *tip: you may have to go back and cut various areas a bit more – use a piece of sandpaper to smooth any rough cut edges.
step 6: choose the paper you would like as the main paper (this is what is shown on the top) and cut paper to same size as your foam board piece and place it face down on to the cutting mat.
step 7: apply adhesive to foam board. *tip: be sure to use adhesive around the niche.
step 8: adhere the cut foam board to the back of the paper also placing it face down.
step 9: using a craft knife, cut an line in the paper going down the center.
step 10: next cut various lines into the center cut line working from the corners and edges of your foam board to create several cut "pleats".
step 11: begin folding the "pleats" up into the niche
step 12: apply adhesive on to the back of the foam board around the niche area and fold over "pleats" securing to the back.
step 13: select paper you want as your background to show through the niche and trim to size of foam board.
step 14: apply adhesive to the back of the entire foam board piece.
step 15: flip foam board over and place down on to background paper. *tip: be sure to center foam board on to background paper.
step 16: using ink blending tool, apply distress ink to edges of the niche to create a shadow effect. tip: this step will make the cut out area look deeper and also cover up any possible cutting "issues".
step 17: continue inking all edges of project using ink blending tool and distress ink. *tip: by inking the edges, this will draw your eye into the niche.
step 18: adhere dimensional object into the niche using glossy accents. *tip: glossy accents can adhere metal, plastic, paper, glass, fabric, and wood objects and dries clear.
step 19: now it’s up to you – let your creativity run wild!
 now that you’ve followed the process, here’s the same technique applied to an atc (artist trading card) or you could use this as a greeting card. see…i told you this technique could be applied to any paper craft project…


