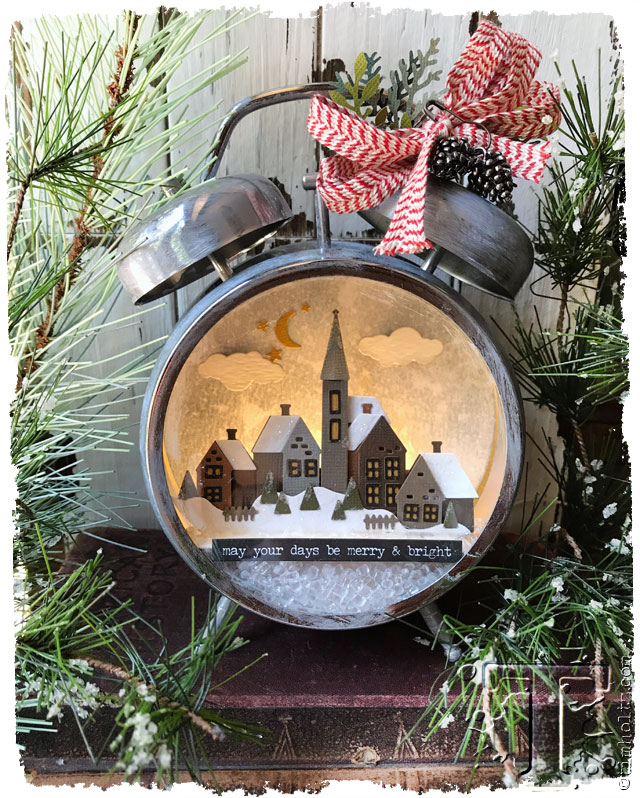
 with christmas just a couple weeks away, the hustle and bustle of the holidays might seem overwhelming. as crafters we all know it’s never too late to create right? so take a little time for yourself and make something magical. here’s one of my favorite festive projects i taught earlier this year at a trade show that i want to share with all of you – think of it as your own mini holiday workshop…t!m
supplies used:
(Sizzix Alterations) #662421 Snowglobe #2 Thinlit, #660170 Pine Punch, #660171 Juniper Punch, #660172 Laurel Punch, Vagabond 2; (idea-ology) Assemblage Clock, Kraftstock, Adornments Pinecones, Small Talk Occasions, Trimmings, Loop Pins; (Ranger) Distress Ink/Weathered Wood, Distress Grit-Paste, Distress Glitter/Rock Candy, Distress Collage Medium/Matte, Distress Paint/Picket Fence, Distress Watercolor Cardstock, Mini Ink Blending Tool, Mini Mister; (Tonic) Scissors; (Scrapbook Adhesives) Black 3D Foam Squares; (Misc.) Hot Glue, Paint Brush, Chipboard, Lights, Filler
prepping for the project:

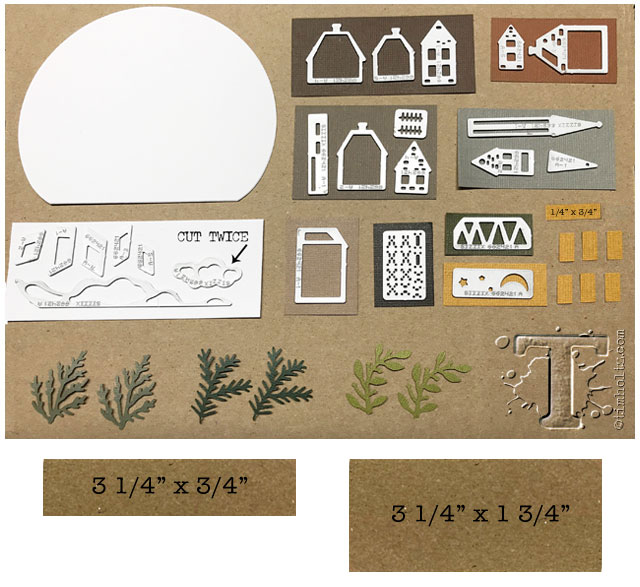
– start by die cutting all of the elements for the snowglobe and punch a few pieces of festive greenery. i prefer to cut by color so i group the dies per color, cut a piece of paper to fit them, and die cut the group (saves so much time). *note: read the next tip before removing any of the die cut pieces.

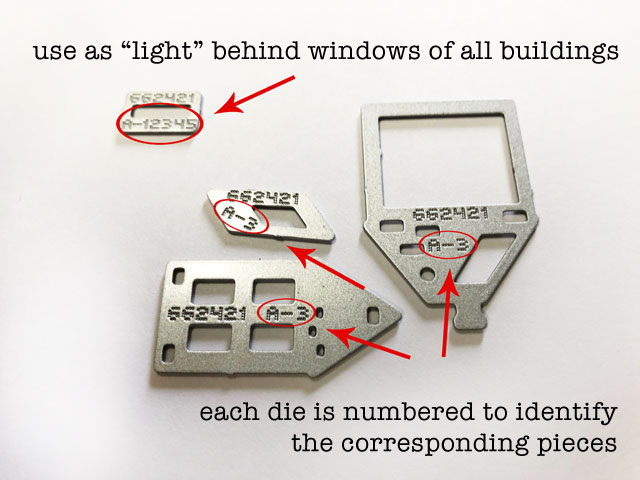
– did you know that on the back of each of the building dies are engraved numbers. these numbers identify which pieces correspond to each other (pretty cool right?). the basic rectangle die has numbers 1-5 because it is to be used as the “light” behind all windows (but honestly i prefer to cut cardstock to fit as needed like i did for the bell tower).

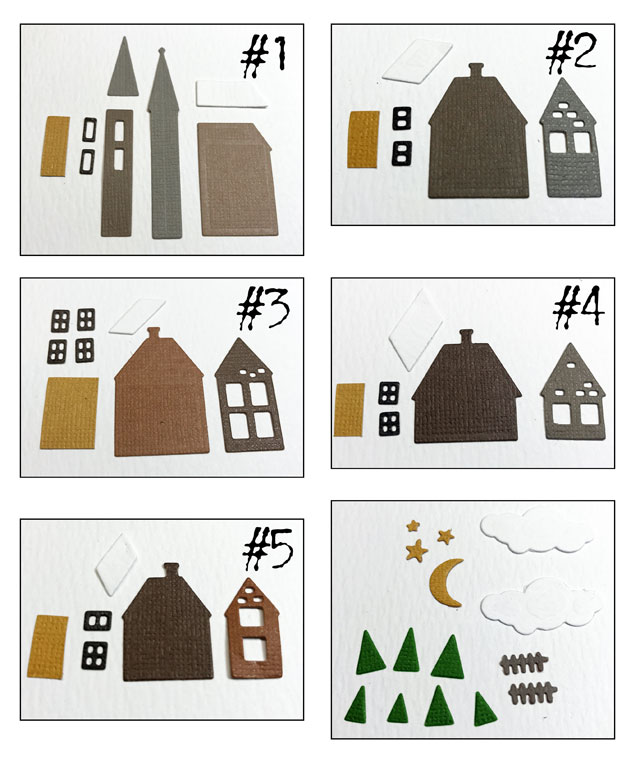
– sort all die cut pieces by building # and keep the remaining pieces for the scenery.

– cut two pieces of chipboard 3 1/4” x 1 3/4” and 3 1/4” x 3/4″ and apply distress grit-paste to the largest piece using your finger and let dry. set the smaller chipboard piece aside, we’ll use it later.
– ink the background of the snowglobe with distress ink using a blending tool.
– spritz with water and blot off with a paper towel to create a snowy effect.
BUILDING #1

– i find it easiest to glue these tiny pieces with distress collage medium and a toothpick. you might be thinking that a fine tip applicator would do the trick, but this way is so much faster. it’s also important to TRUST that distress collage medium will dry completely clear, completely matte, and very fast so don’t be afraid to use it. note: we will do this first building piece by piece, but the other buildings are done the exact same way so just repeat these steps as we proceed.
– start by adhering the snow roof to the top of the base building lining up with the top and side.
– flip the die cut piece over and apply collage medium to the back to adhere the “light” source cardstock.

– add collage medium to the front and adhere the window frames.
– remember distress collage medium dries clear, but it also dried fast so adhere one window frame at a time.
– adhere the pointed spire to the column.

– gently fold the triangle piece and adhere it over the spire to add a little dimension.
– apply a small piece of foam adhesive to the back of the tower (i prefer to cut my adhesive squares in half). note the placement of the foam adhesive, it’s important for later.
– adhere the tower to the edge of the building as shown.
BUILDING #2

– following the previous steps assemblage the building as shown.
BUILDING #3

– following the previous steps assemblage the building as shown.
BUILDING #4

– following the previous steps assemblage the building as shown.
BUILDING #5

– following the previous steps assemblage the building as shown.

– now it’s time to assemblage our village. paint both sides of the small piece of chipboard cut earlier with white distress paint.
– adhere the bottom section of building #1 to the chipboard centering the spire as shown.

– adhere building #3 and slide part of it behind the spire of building #1 as shown (there should be room since we placed our foam tape high on the spire remember?).
– adhere building #4 slightly over building #3 butting it up to the right edge of the chipboard as shown.

– adhere building #2 next to the spire as shown.
– adhere building #5 slightly over building #2 butting it up to the left edge of the chipboard as shown

– add the snowdrift with foam adhesive, and secure the outer ends with collage medium if needed.
– adhere the trees and other accent pieces with collage medium and the village is built.

– ink the edges of the clouds, moon, and stars with distress ink using an ink blending tool.
– apply foam adhesive to the back of the clouds.
– position the village along the bottom of the globe to determine the placement of the clouds (DO NOT ADHERE THE VILLAGE).
– adhere the clouds, moon and stars.

– to add a dusting of “snow” apply collage medium to the rooftops and snowdrift.
– immediately cover with rock candy distress glitter and let dry.

– secure the village to the grit-paste chipboard base by applying a bead of hot glue along the edge as shown.
– position the village about center and hold in place to dry.
– adhere a small talk sticker along the front edge with hot glue.

– remove backing of assemblage clock and insert village into the clock.
– position the village so it rests level along the inner edges of the clock.
– apply hot glue to the edges to secure as shown.
– fill the bottom portion with clear plastic filler (found in the floral dept. at the craft store) or you can use tiny beads, etc.

– adhere the snowglobe background to the inside backing of the assemblage clock with collage medium (a perfect fit).
– if you’re going to add tiny lights (*optional) then you will need to poke or drill a hole into the backing larger enough to feed the lights through.
– feed the lights starting from the OUTSIDE in and take your time since the metal around the hole may be sharp. once the lights are inserted, apply a dot of hot glue over the hole to close and secure the light string. *note: i found these lights on amazon, but you can find similar little lights all over the place this time of year.

– you can choose to leave your lights loose inside the clock or secure them in place.
– i simply wrapped the lights around a craft stick and glued the craft stick to the background with hot glue as shown.
– carefully place your backing back on to the clock positioning your lights as needed.

– at this point you can leave the clock the shiny silver, or create a shabby effect by dry brushing white paint over the clock and wiping the excess off.
– gather some punched greenery or use artificial greens if you have them.
– tie a bow around the clock handle and embellish with greens and findings for the perfect finishing touch.


