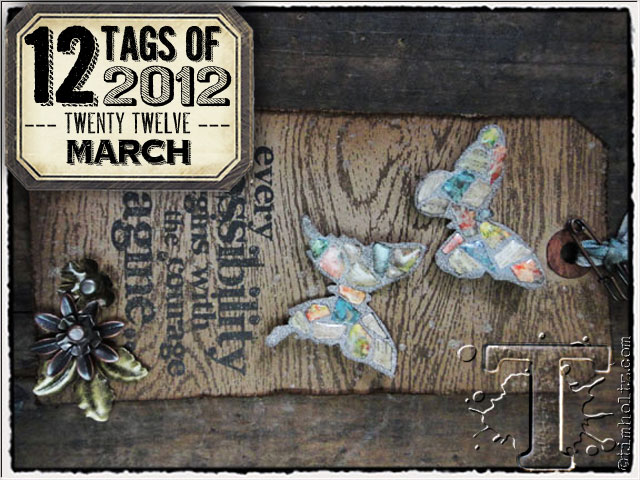
it’s time for this month’s tag in the 12 tags of 2012 series! thanks again for all of the kind words, excitement, and support of the new direction for the 12 tags. i really hope this will inspire many of you to take time each month to create something, anything, just give yourself that. it’s been great seeing how many of you are participating in the monthly challenge to upload your project based on the posted tag, and as promised winners will be selected based on those who posted and will be listed at the end of this post. right now, we have a tag to get to! i’ve been inspired by spring, and i think this mini paper mosaic technique will be useful throughout the year on everything from cards & tags to journal covers and more – so let’s get started…

supplies: craft sheet; ink blending tool; distress ink/walnut stain/vintage photo; distress stain/weathered wood; glossy accents; wonder tape; antiquities embossing powder/cement; archival ink; perfect pearls mist/heirloom gold; #8 kraft tag; heat tool; grungeboard; foliage; trimmings; paper stash/lost & found; design ruler; stamps/cms110/cms126; grid-blocks; mini butterflies die; base tray; vagabond; scissors; paper distresser; craft pick; quick-stick

step 1: place both mini butterfly dies on movers & shapers base tray and measure with design ruler.

step 2: cut a piece of grungeboard and wonder tape slightly larger than measured size of butterflies.

step 3: remove paper backing from wonder tape and adhere to grungeboard.

step 4: place tape side down and die cut butterflies using vagabond machine.

step 5: remove butterflies and set frame aside to use on another project.

step 6: cut out several snippets from paper stash (snippets are mini 2″x2″ designed paper a perfect for using on smaller projects without losing the details of the paper).

step 7: cut some of each of those snippets into appropriate sized pieces for your mosaic. since we are going to be creating a mosaic on the mini butterflies, these pieces are super tiny for this project.

step 8: remove the red liner of the wonder tape of one butterfly.

step 9: using a “quickstik” or tweezers, etc. begin placing your little paper mosaics on to the sticky butterfly. wonder tape is very sticky so take your time and be sure to leave a space in between each mosaic you place down.

step 10: continue placing pieces by trimming down as needed to fit.

step 11: repeat previous steps for other butterfly. *make sure all paper pieces are secured flat to butterflies.

step 12: place butterflies on scrap paper and cover with cement antiquities embossing powder. (i love this powder for the color and texture for “grout”)

step 13: fold paper in half and press down to push the embossing powder into the exposed wonder tape areas between the mosaics.

step 14: remove excess powder and heat emboss butterflies until embossing powder melts. this is the significance of wonder tape and the fact that it is embossable and heat stable – most other double-stick tapes are not. cool huh?

step 15: once embossing powder has melted allow them to cool for a minute.

step 16: begin applying glossy accents over each paper mosaic only. do not get the glossy accents on the embossing powder as this is the “grout” for our mosaics and it needs to stay matte and textured.

step 17: repeat glossy accents on other butterfly and set aside to dry.

step 18: mount wood stamp on to grid-block.

step 19: ink stamp with walnut stain distress ink.

step 20: stamp woodgrain going horizontal across kraft tag as shown.

step 21: remove stamp to see area you’ve stamped. i absolutely love this woodgrain stamp since it has such a realistic look and can be used horizontal or vertical.

step 22: apply more distress ink to stamp and stamp on the remaining exposed area of the tag.

step 23: remove stamp and you should have entire tag stamped like wood planks at this point. (love this stamp!)

step 24: ink the edges of the tag with vintage photo distress ink using an ink blending tool to create shading.

step 25:drag paper distresser along edges of tag to tatter.

step 26: ink edges with walnut stain distress ink using an ink blending tool to create a burn effect.

step 27: ink edges of both butterflies with ink blending tool to shade.

step 28: stamp text with archival ink on tag.

step 29: place foliage on bottom area of tag and pierce holes with craft pick.

step 30: attach foliage to tag using long fasteners.

step 31: shake perfect pearls mist and lightly spritz over tag with pearl and let dry.

step 32: adhere butterflies to dry tag using glossy accents, and gently bend wings for added dimension. embellish top of tag with stained trimmings.

the details: check out the dimensional look of these mini mosaic tiled butterflies.

the details: the texture of the embossing powder compared to the glossy accents give these an authentic look and feel of mosaic tiled pieces.
such a fun technique bloggers! like i said, you can create this on so many various surfaces. just remember the larger then surface, the larger the mosaic pieces. who knew paper could change it’s look and feel like this? i love it and can’t wait to see what you create this month and upload to the blog. happy mosaic…t!m
congrats to the winners from the february 12 tags of 2012 gallery posts. if you see your name below, please contact mario@timholtz.com to claim your prize!
1. donna bowman
2. lorna moore
3. msplum
4. julie case
5. ivette
6. candy colwell
7. sharon celtcrafter
8. flo-louise
10. eveline van heijst
11. cora hoekstra
12. sara jansen
here's a place to share your own project inspired by today's 12 tags of 2012 right here on my blog!
to get started: click on the (add your link) button at the bottom of the post. after you enter your info, click (next step) and you'll be able to select the photo you wish to display as a thumbnail *please only post your project photo. you may link from your blog or from a public image-hosting site. *note: your photo will appear in random order so please upload it only once
| | | | |
| | | | |
| | | | |
| | | | |
| | | | |
| | | | |
| | | | |
| | | | |
| | | | |
| | | | |
| | | | |
| | | | |
| | | | |
| | | | |
| | | | |
| | | | |
| | | | |
| | | | |
| | | | |
| | | | |
| | | | |
| | | | |
| | | | |
| | | | |
| | | | |
| | | | |
| | | | |
| | | | |
| | | | |
| | | | |
| | | | |
| | | | |
| | | | |
| | | | |
| | | | |
| | | | |
| | | | |
| | | | |
| | | | |
| | | | |
| | | | |
| | | | |
| | | | |
| | | | |
| | | | |
| | | | |
| | | | |
| | | | |
| | | | |
| | | | |
| | | | |
| | | | |
| | | | |
| | | | |
| | | | |
| | | | |
| | | | |
| | | | |
| | | | |
| | | | |
| | | | |
| | | | |
| | | | |
| | | | |
| | | | |
| | | | |
| | | | |
| | | | |
| | | | |
| | | | |
| | | | |
| | | | |
| | | | |
| | | | |
| | | | |
| | | | |
| | | | |
| | | | |
| | | | |
| | | | |
| | | | |
| | | | |
| | | | |
| | | | |
| | | |


