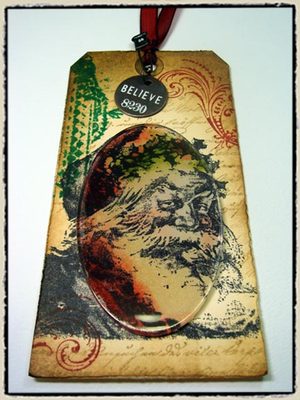
 "day 3" -tim holtz(c) 2008
supplies: craft sheet, distress ink/fired brick, aged mahogany, peeled paint, pine needles, antique linen, frayed burlap, vintage photo, archival ink/jet black, glossy accents, adirondack paint dabber/snow cap, ink blending tool (ranger); fragments/circles & ovals, philosophy tags, trinket pins, jump rings (tim holtz idea-ology); scissors, paper distresser (tonic); stamps/santa U2-1379, script P3-1378, scroll P5-1374, frame V1-1161 (stampers anonymous); tags, ribbon
step 1: working on craft sheet stamp santa image on to 2 different tag using archival ink. let dry. (*ink must be a waterproof ink.)
step 2: begin inking one of the tags only using antique linen distress ink with ink blending tool. (*this tool is key to applying a smooth and blended application of ink.)
step 3: tint areas of stamped image using fired brick distress ink with ink blending tool in a tapping motion.
step 4: tint the holly of the stamped image using peeled paint distress ink with ink blending tool in a tapping motion.
step 5: apply glossy accents to one side of largest oval fragment and spread around adhesive with tip of bottle or your finger. (*it is important that the entire fragment has glossy accents on it.)
step 6: place fragment on to inked images and press down forcing out any excess accents and air bubbles. hold in place for about 30 seconds. (*i use glossy accents for this vs. "others" since it has such a fast drying time and will not bleed the distress inks. also if working on photos for this technique be sure DO NOT use this with ink jet photos.)
step 7: cut around fragment using non-stick scissors trimming as close to the edge as possible.
step 8: on the second tag, begin inking with antique linen distress ink using ink blending tool around the edges of the tag slightly blending ink into center. *(do not ink the santa image too much.)
step 9: ink edges with vintage photo distress ink with ink blending tool.
step 10: stamp script over background with frayed burlap distress ink. stamp several times around, but not over, the santa image. *(frayed burlap is a light brown ink to the background text is subtle.)
step 11: stamp scroll with aged mahogany distress ink in corners of tag.
step 12: stamp edge of frame along side of tag with pine needles distress ink.
step 13: drag paper distresser along edge of tag to create a tattered look on the edges.
step 14: apply glossy accents to the back (paper side) of the fragment and spread out with the tip of the bottle. (*do not use too much for this step or it will make a mess on your tag.)
step 15: place fragment over stamped santa on tag lining up the image.
step 16: press and hold in place for about 30 seconds until dry. (*what a cool effect! a spotlight of color on a black and white image.)
step 17: apply snow cap paint dabber over philosophy tag to color word and number.
step 18: lightly wipe wet paint off of tag with cloth – paint will remain in recessed areas.
step 19: apply snow cap paint dabber over trinket pin to color ward and number.
step 20: lightly wipe wet paint off of pin with cloth – paint will remain in recessed areas. (*love these!)
step 21: attach philosophy tag to trinket pin with jump ring securing it to the bottom ring of pin.
step 22: attach a ribbon through top of tag and secure pin through ribbon.
step 23: notice how the bold word on the metal tag compliments the subtle text background. (*remember it’s all in the details.)
*in the details: just a close up view of the spotlight image fragment. (*try this with various size fragments over photos. you will need to print 2 photos (1 color/1 black and white) and adhere your fragment to the color one with glossy accents, cut out, and adhere over same area of black and white photo – too cool!)


