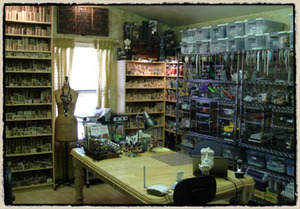
 so here we go… in the next few days, i want to share some pictures of my studio and show you some ideas of how i stay organized. i get asked all the time about the space i create in, where do i find inspiration, and am i organized??? well the key to my creative world is my studio (which used to be the master bedroom), some call it their craft room, maybe you call it your dining room table, wherever you create, that’s your place and you have the right to call it what you want to and embrace your space…
i like to stay organized, even though my art is an assemblage of all types of things that often resembles chaos – let’s just say it’s organized chaos. so how do i describe my organizational style? i am a digger, i’m not the kind of person who likes to have every little thing in it’s little drawer or little box or divider by every little color, i like to dig! i think sometimes it inspires me to find things or come across things i may not originally set out to use, but by digging thorough things, i find inspiration. now that doesn’t mean i have one big pile of stuff, i do have categories of my supplies (ribbons, punches, adhesives, rub-ons, etc.).
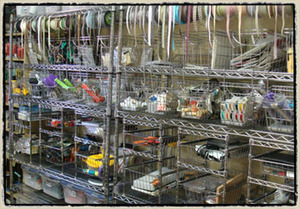
 i figured i will take you through areas of my workspace and what things work for me. the main wall in my studio is lined with wire shelving. these shelves were purchased at Costco, they are heavy duty, can handle 800lbs. and i love the ability to see everything through them. the fact that these shelves are adjustable means you can fit anything you want into them so you have many options. next i added some wire baskets and wire drawers that are from the Martha Stewart Collection at K-mart. you can also find wire things at Linens & Things, Ikea, Target, or the Container Store. i use the wire bins for things like rub-ons, foam stamps, book kits, fabric scraps, and various trims. the sliding drawers allow for things like paper trimmers, punches, and other tools to have access to slide out and get what you need.
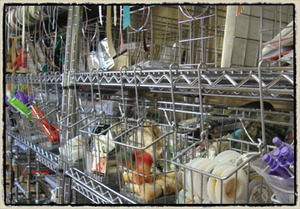
 these little hanging baskets are from Ikea, i like the way they can just hang on the side of the shelving. these baskets normally hang from a rod you can have directly on the wall, but i liked using them here too. the convenience of being able to just lift the basket off the shelf and work from it on the table is also a plus. i store things like stipple brushes, wire, brayers, ink tools, and hand punches that i use the most. i have also taken advantage of the shelf behind them with more wire baskets. if i need to get to those, i just slide the hanging baskets aside and pull the basket off the shelf. there are also options for a storage system like this from Cropper Hopper called the "Rail System".
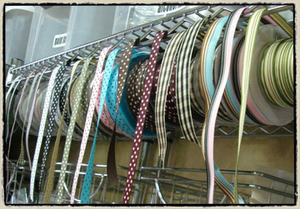
 i tried to take advantage of every space on the wire racks and I need a place for my ribbons. now i’ve heard of using rain gutters from the hardware store, or even ribbon boxes, but again i like to be able to see what i have. so i bought a metal draw rod from Ikea and insert it through the spools of ribbon. then i hung the rod from simple S-hooks (you know the ones that just look like an "S"). i then fed the ribbons through the wavy part of the shelves and it keeps them separated and works great! well there you have it, just a start of how i try to stay organized. keep in mind that your space is all about you, it doesn’t have to be fancy, it just has to be comfortable, and inspiring to you. i like to take simple things and make them work for what i need them to do. so what works for you? share some of your ideas and post them on the blog. the more you share the more i will share – fair enough? we must never lose sight of the fact that we are in an industry of sharing ideas, being creative, and enjoying the moments – that’s what it’s all about…
-t!m


