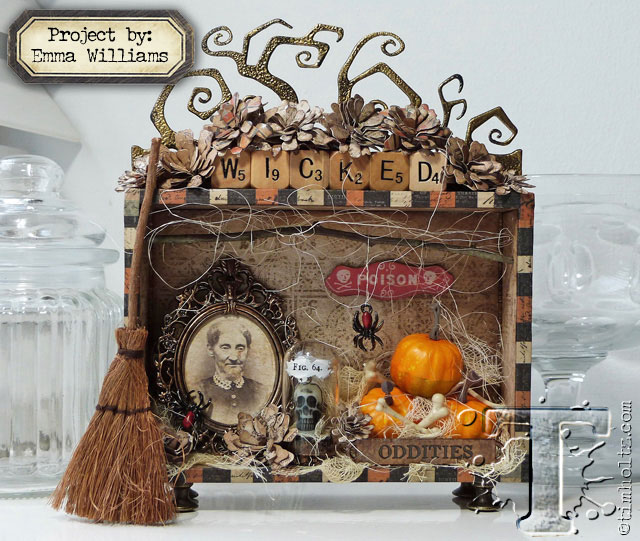
 today’s project is a treasure-trove of halloween creativity created by emma williams. each devious detail tells a tale of artful oddities that something wicked this way comes…t!m
supplies:
- inks: Clear Distress Embossing Ink Pad, Distress Ink/Walnut Stain, Distress Spray Stain/Antique Linen, Distress Mica Spray/Brushed Pewter; Alcohol Ink Latte/Pitch Black, Gold Mixative
- paints: Distress Paint/Black Soot/Candied Apple, Ranger Gold Metallic
- mediums: Collage Medium/Matte, Gesso, Clear Embossing Powder, Glossy Accents
- surfaces: Paper Stash/Materialize, Black Card
- embellishments: Broomsticks, Ephemera/Curiosities, Boneyard, Pumpkin Pieces, Adornments/Wicked, Word Bands/Incantation, Remnant Rubs/Gothic, Design Tape/Materialize, Baroque Frames, Alpha Dice, Corked Domes, Vignette Box
- tools: Alcohol Application Tool, Blending Tool, paintbrush, Distress Collage Brushes, Heat Tool
- dies: Thinlits/Twisted Edge/Tiny Tattered Florals
- misc: Antique Vintage Feet, Floristry Sisal, Cheesecloth, Metallic Cotton Thread
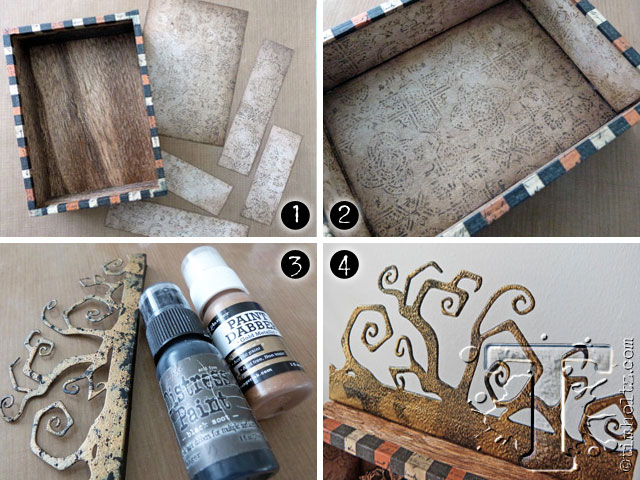
Step 1: Using the largest vignette box from the set, cover the raw edges on the front of the box with the striped Materialize Design Tape.
Step 2: Using one of the papers from the Materialize Paper Stash, cut into panels measuring 5’ x 3.5”, 2 panels at 1 1/8” x 3.5” and 2 panels at 1 1/8” x 5”. Ink the edges of the paper, apply a layer of Collage Medium to the back of each panel and attach to the back and sides on the inside of the box.
Step 3: Use the Twisted Edge die to die cut a piece of black card, placing the die onto the card and leaving a border of approx 1” along the straight bottom edge and run through the machine. Place the die cut in front of you and measure 0.5” from the straight edge and score a horizontal line across. Fold along the scoreline, creating a 90 degree angle and ensuring the Twisted Edge is upright. Apply Black Soot Distress Paint and Ranger Metallic Gold Paint to the front of the die cut, using the dabbers to create a stippled effect to the surface. You can keep building up the paint as you go but dry between layers. Heat dry the finished painted surface thoroughly. Randomly dab the painted surface with Clear Embossing Ink, if you miss any part of the die cut, this doesn’t matter as you want to create a stippled uneven finish. Sprinkle Clear Embossing Powder over the top, tapping away the excess and heat emboss the powder until molten.
Step 4: Attach the die cut centrally to the top of the box using Collage Medium along the folded edge and add a strip of the sparkly black Materialize Design Tape along the fold to cover join on box.
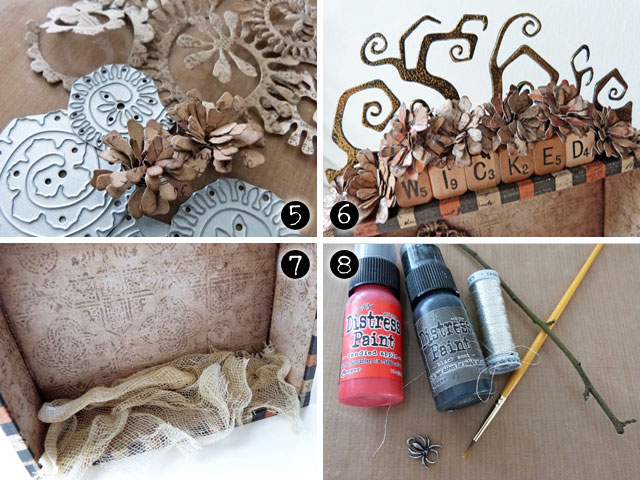
Step 5: Using papers from the Materialize paper stash and the Tiny Tattered Florals dies, die cut a selection of 11 various sized flowers. Once the dimensional flowers are assembled, spritz over the top with Brushed Pewter Mica Spray, allowing to dry throughly.
Step 6: Attach 8 of these flowers to the top section of the box, arranging them together with Alpha Dice Findings spelling the word “Wicked”.
Step 7: Cut a piece of cheesecloth and spritz Antique Linen Distress Spray Stain over the cloth to dye it. Dry thoroughly before attaching it on the inside base of the vignette box.
Step 8: Using a twig cut it so it will fit across the inside of the box. Paint two of the Wicked Spider Findings using Black Soot and Candied Apple Distress Paint. Attach one of the painted spiders to a loop of metallic cotton thread and hang this from the twig.
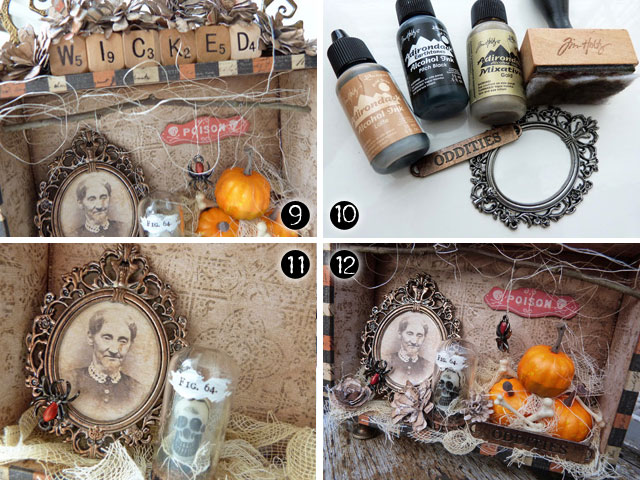
Step 9: Attach the twig to the inside of the box, together with a “Poison” Ephemera Piece.
Step 10: Apply small drops of Pitch Black, Gold Mixative and Latte Alcohol Ink to the applicator tool and apply the ink to the surface of the Oddities word band and the Baroque Frame to create a rusty, tarnished look to the metal
Step 11: Cut out one of the photo images from the papers in the paper stash and attach to the back of the baroque frame, adding a painted Wicked Spider Finding to sit on the left hand side of the frame. Add the frame to the inside of the box, applying a small amount of Collage Medium to the top and bottom to fix it securely into place. Add a Boneyard Resin Skull to the inside of a Corked Dome, placing the skull onto a small piece of cheesecloth and securing the glass to the cork by using a small amount of Collage Medium around the base. Once secure, brush a small amount of gesso across the top section of the dome and when thoroughly dry, add a Remnant Rub from the Gothic set. Place the dome next to the frame inside the box.
Step 12: Add an arrangement of pumpkins and Resin Bones to the right hand side of the box and attach the inked Oddities word band in front, using Glossy Accents to secure it into place. Attach the remaining flowers around the arrangement of oddities , together with some Sisal Floristry Fibers. Finally, attach the Broomstick to lean against the left hand side of the box and as a finishing touch, I added four vintage brass feet that I had in my stash.


