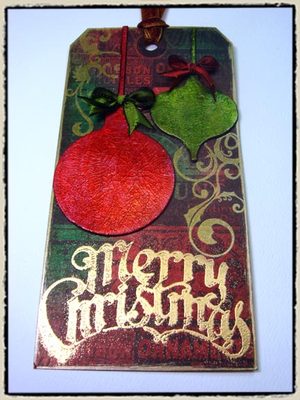
 "day 8" -tim holtz(c) 2008
supplies: craft sheet, distress inks/aged mahogany, pine needles, walnut stain, distress metallic crackle paint/brushed pewter, adirondack alcohol inks/red pepper, cranberry, lettuce, meadow, ink applicator tool, distress embossing ink, queen’s gold embossing powder, jet black archival ink, heat tool, glossy accents, adirondack metallic paint dabber/gold (ranger); seasonal grungeboard (tim holtz idea-ology); stamps/holiday memories V4-1191, merry christmas K3-1188 (stampers anonymous); metallic rub-ons (glitz design); dot n go (glue dots); ribbon, tag
step 1: remove 2 ornaments from seasonal grungeboard sheet.
step 2: attach glue dots to back of grungeboard pieces.
step 3: press down on to non-stick craft sheet. (*this will hold the pieces in pace allowing us to paint them without moving all over the place. – remember this trick from yesterday?)
step 4: shake distress metallic crackle paint – very well.
step 5: unscrew brush cap and begin painting a medium coat of paint on to grungeboard.
step 6: continue until both pieces are painted with distress metallic crackle paint. let dry and crackle. (*this will take between 30 minutes to an hour. metallic crackle paint takes a little longer to crackle than the regular crackle paint and this paint CANNOT be heated to speed up the drying time.)
step 7: once the pieces are completely crackled, remove from craft sheet and trim off any excess paint from grungeboard. you can most often just peel the excess paint away with your fingers. check it out! the distress metallic crackle paint, crackles differently than regular crackle too – it creates more of a "crazing effect" to resemble vintage mercury glass. i love this stuff and now we’ve created a metallic surface!
step 8: and you know what we can do to a metallic surface right? alcohol inks of course! attach a piece of felt to your ink applicator tool. (this can be the same handle as your ink blending tool, but we’re using felt instead of blending foam.) press nib of cranberry alcohol ink bottle directly into felt and squeeze bottle for about 2 seconds to dispense ink into the felt. repeat with red pepper alcohol ink directly next to cranberry ink. (*i prefer to use to tones of color for more depth.)
step 9: stamp inked tool on to metallic crackled grungeboard be sure to work on the non-stick craft sheet. (*the slick metallic surface allows the alcohol inks to blend.)
step 10: repeat until entire grungeboard piece is inked. notice how the color just pops on the metallic surface and how the ink accents the cracks!
step 11: remove felt and attach a clean piece. ink with lettuce and meadow alcohol inks and ink the smaller grungeboard piece. (*the alcohol inks will dry within seconds. to lighten the color you can use blending solution if needed.)
step 12: stamp holiday memories stamp on to tag with jet black archival ink. stamp until entire tag is covered with images. let dry. (*i like to break up my larger stamps and not always start them directly in the center – it’s just more random that way. also, it’s important to stamp in a permanent ink for this step.)
step 13: stamp merry christmas stamp with distress embossing ink.
step 14: apply queens gold embossing powder over image and remove excess powder.
step 15: heat emboss the image until powder melts and creates a raised metallic image.
step 16: ink areas of tag with aged mahogany distress ink using ink blending tool. (*notice how the embossed image with resist the distress inks so you can ink as much as you want over the top.)
step 17: ink remaining areas of the tag with pine needles distress ink using ink blending tool.
step 18: ink edges of tag with walnut stain distress ink using ink blending tool.
step 19: drag gold metallic paint dabber along edges of the tag to accent.
step 20: adhere both grungeboard ornaments to tag with glossy accents. let dry.
step 21: with scissors, cut out metallic rub-ons. (*these rub-ons are a shimmery metallic that go on with ease! i love the design of glitz and the fact that you get gold and silver on the same sheet. pretty cool!)
step 22: apply rub-ons with craft stick around ornaments. (*i prefer to add my rub-ons after i adhere the ornaments so i know the areas i want to fill in.)
step 23: tie bows from ribbon and adhere to tops of grungeboard ornaments with glossy accents. let dry.
*in the details: look at how nostalgic and vintage this grungeboard looks! it went from plain grungeboard, to metallic pewter, and then to colorful "faux mercury glass ornaments". also, take a look at those metallic rub-ons – love it!


