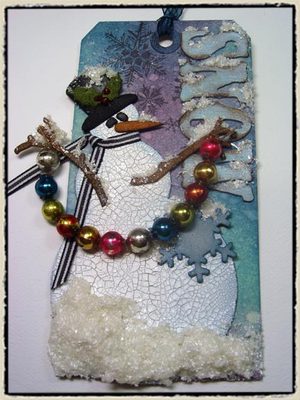
 "day 7" -tim holtz(c) 2008
supplies: craft sheet, distress crackle paint/picket fence, distress stickles/fired brick, distress inks/weathered wood, faded jeans, broken china, peeled paint, spiced marmalade, vintage photo, walnut stain, black soot, dusty concord, ink blending tool, adirondack paint dabber/cloudy blue, UTEE ultra thick embossing enamel/clear, white, perfect pearls, glossy accents, mini mister, heat tool (ranger); seasonal grungeboard, sanding grip (tim holtz idea-ology); glue dots dot n go (glue dots); stamp/snow flurries K3-1372 (stampers anonymous), glass glitter, bowl, stick, gloves, ornament strand, ribbon
step 1: remove snowman from grungeboard seasonal pack.
step 2: attach glue dots to back of grungeboard with dot n go.
step 3: place grungeboard on to craft sheet. (*this will keep the grungeboard in place while painting it so i don’t have to hold it with my finger or stab it with anything. a great tip when you’re painting smaller things too.)
step 4: shake picket fence distress crackle paint.
step 5: unscrew brush cap and paint a medium layer of paint over grungeboard. let dry and crackle. (*i love this new white crackle paint perfect for wintry things. distress crackle paint is self leveling so you can paint in any direction. allow paint to dry and crackle on it’s own – usually takes about 30 minutes.)
step 6: remove snowman "pieces" from seasonal grungeboard sheet.
step 7: ink carrot nose with spiced marmalade distress ink using ink blending tool.
step 8: ink twig arms with vintage photo distress ink using ink blending tool.
step 9: ink top hat and coal eyes with black soot distress ink using ink blending tool.
step 10: ink holly with peeled paint distress ink using ink blending tool.
step 11: remove snowflake grungeboard and ink with broken china distress ink using ink blending tool.
step 12: remove grungeboard letters "SNOW" and paint with cloudy blue paint dabber. let dry.
step 13: sand edges using sanding grip to expose areas of grunge.
step 14: ink with walnut stain distress ink using ink blending tool.
step 15: mist cloth with water from mini mister.
step 16: wipe inked letter with damp cloth to remove distress ink. (*paint dabbers resist distress ink so the ink only stays where we’ve sanded.)
step 17: tap ink blending tool into weathered wood distress ink and ink tag by working in a circular motion starting on your craft sheet. (*this is important to avoid harsh ink lines – always place tool on your craft sheet and without lifting it off, work in a circular motion pulling the ink from the sheet on to your tag.)
step 18: repeat above step using broken china distress ink.
step 19: repeat above step using faded jeans distress ink.
step 20: repeat above step using dusty concord distress ink. (*notice how distress inks allow you to blend numerous colors on one background.)
step 21: make a cup with your fingers and spritz water into your hand from mini mister.
step 22: flick the water on to your inked tag creating water droplets.
step 23: let water set on tag from at least 10 seconds and then blot with paper towel. (*distress inks are reactive with water.)
step 24: dry tag with heat tool. (*this technique creates the look of "faux bleach". cool huh?)
step 25: stamp snow flurries stamp on tag with black soot distress ink.
step 26: once grungeboard snowman has dried and crackled, remove from craft sheet and ink edges with weathered wood distress ink using ink blending tool.
step 27: apply glossy accents to back of grungeboard.
step 28: adhere to tag and slide a piece of ribbon behind head around neck of snowman.
step 29: tie ribbon to create scarf and secure knot with small amount of glossy accents.
step 30: cut holly grungeboard pieces apart.
step 31: adhere all grungeboard elements to snowman with glossy accents.
step 32: gather the following supplies before proceeding: clear UTEE, white UTEE, glass glitter, perfect pearls, glossy accents, bowl, craft stick, gloves.
step 33: combine dry ingredients into bowl. (*to be honest there really isn’t a specific recipe since it depends on the amount of "snow" you want to create.)
here’s a simple guide to follow:
1 part white UTEE
2 parts clear UTEE
1 part glass glitter
1 scoop perfect pearls (use craft stick)
step 34: add glossy accents to dry ingredients. (*again this doesn’t have a specific amount, you just add liquid and stir. start with about a quarter size amount.)
step 35: stir mixture with craft stick.
step 36: continue to add more glossy accents stirring the mixture constantly until you get a cookie-dough-like consistency. (*glossy accents is a glue so be sure to work on craft sheet. also, do not let this sit – you must mix it and use it right away.)
step 37: wearing gloves, scoop mixture with your hands and press it on to the bottom of the tag creating a snow mound. you can build this up as high as you want. the mixture won’t feel like it’s going to stick but TRUST ME – it sticks to everything it touches. (*be sure to wear gloves…you’ve been warned!)
step 38: scoop up more snow mixture and rub it across grungeboard accents, the snow will stick into any recessed areas creating a snow drift look. let dry. this should only take about 15 minutes. (*and yes…it will stick!)
step 39: accent holly on hat with fired brick distress stickles to create berries.
step 40: attach a strand of ornaments or bead garland to twig hands with glossy accents and let the rest of the strand hang freely.
*in the details: the textures of this tag are incredible. the dimension of the snow, the crackled grungeboard snowman, and the smooth glass garland adds just the right touch.


