 “say 2” -tim holtz(c) 2008
supplies: craft sheet, adirondack alcohol inks/denim, stream, stonewash, slate, eggplant, adirondack metallic mixatives/silver, adirondack blending solution, archival ink/jet black, distress embossing ink, embossing powder/black, distress inks/weathered wood, frayed burlap, faded jeans, ink blending tool, heat tool, glossy cardstock (ranger); grungeboard/elements swirls, long fasteners, washers (tim holtz idea-ology); rub-ons (hambly); ghost snowflakes (heidi swapp); stamps/skinny tree P3-1373, snow flurries K3-1372 (stampers anonymous); stamp/holiday text (hero arts); craft pick (tonic); dot n go craft (glue dots); bird charm, ribbon, tag, black cardstock, speckling brush
step 1: shake metallic mixative and apply a squiggle of ink to center of non-stick craft sheet. (*when working with alcohol inks it is IMPORTANT to work on a protective surface that the inks will not permeate and the craft sheet is teflon fused in glass – my favorite working surface.)
step 2: apply various drips, drops, and squiggles or several colors of alcohol inks over the mixative – it’s okay that the inks blend. (*alcohol inks are designed for non-porous surfaces like glossy cardstock, glass, metal, plastic, etc.)
step 3: shake on blending solution over ink mixture. (*the more blending solution you add the lighter your background will be.)
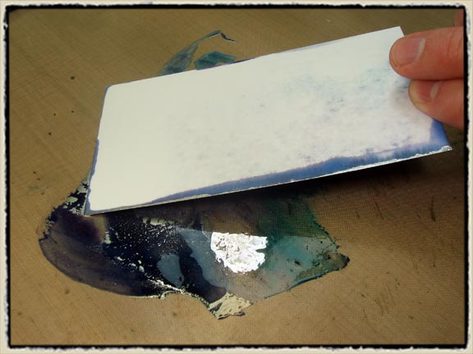
step 4: place glossy cardstock face down and twist paper into ink. (*glossy cardstock is not the same as glossy photo paper. glossy cardstock is clay coated and designed to absorb inks. photo paper is emulsion based and will cause a chemical reaction and get very sticky)
step 5: slide paper up off of craft sheet.
step 6: place background back into same ink and twist again for a second layer.
step 7: slide paper up off craft sheet to reveal background. (*i usually only do 2 layers – anymore than that sometimes get a bit muddy.)
step 8: *this is an optional step if you have ink left over from your first background. add more blending solution and repeat above steps using another piece of glossy cardstock.
step 9: here are the other backgrounds i created simply by adding more and more blending solution to my ink mixture until i was out of ink.
step 10: stamp tree stamp with distress embossing ink on to background. (*make sure alcohol ink is completely dry before this step. – i prefer distress embossing ink when stamping on glossy cardstock since it is a bit lighter ink and the stamp won’t slide on the slick surface as much.)
step 11: pour black embossing powder over stamped image working over a piece of scrap paper.
step 12: remove excess powder and put back into the jar and heat emboss using a heat tool until powder melts and becomes shiny.
step 13: ink snow flurries stamp with archival ink by rubbing vs. tapping the ink pad on the stamp. this will provide a lighter application of ink and give the image a more subtle look. let dry.
step 14: shake metallic mixative again and apply a puddle of ink to craft sheet.
step 15: press speckling brush into ink. (*if you don’t have a speckling brush you can use a toothbrush.)
step 16: slide needle into brush and turn the brush to speckle the ink.
step 17: create tiny speckles of silver ink on your background to create a snow flurry effect. let dry. (*i use mixatives for this step since they are alcohol based and dry very quickly.)
step 18: cut out rub-ons and apply over background (*i like to use white rub-ons to create contrast.)
step 19: remove bookplate from grungeboard elements swirl pack.
step 20: ink grungeboard with distress ink using ink blending tool. (*the embossed swirls really stand out when inked.)
step 21: ink text stamp with archival ink and stamp on to grungeboard.
step 22: place grungeboard on to background and pierce holes with craft pick.
step 23: insert a long fastener through slot in washer. (*washers are designed to work with long fasteners to create the look of a rivet and also to secure things with larger holes than the head of your brad – cool effect!)
step 24: insert fastener through background to secure grungeboard.
step 25: ink tag with distress ink using ink blending tool around edges.
step 26: apply slate alcohol ink directly to silver charm by dripping it on. (*i use slate alcohol ink to create an antiqued tarnished look to shiny charms.)
step 27: adhere background to tag with glue dots using dot n go. (*i matted my background with a little black cardstock to frame it.)
*in the details: attach ghost snowflake to top of tag with long fastener and adhere bird charm to tag also using glue dots. (*remember, glue dots can attach dimensional objects with no problem, and the adhesive stays flexible – love them!)


