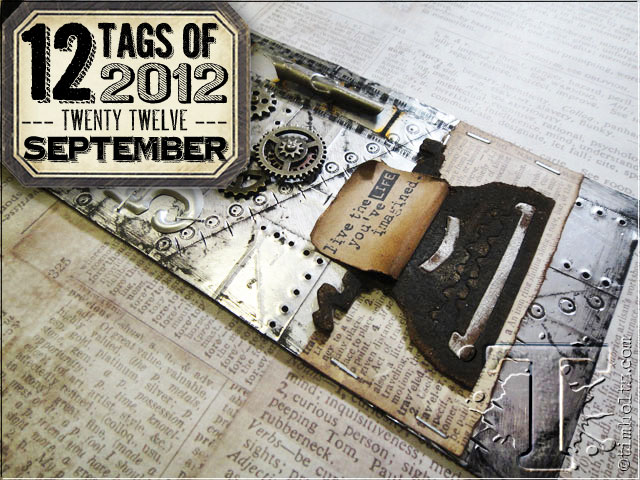
i know i say it every month, but seriously where does the time go? this year has been flying by as far as i’m concerned…i guess so much to do, so little time to get it all done. well hopefully you’ve been taking time to at least create a tag a month and playing along with the 12 tags of 2012. i do enjoy this commitment i made to all of you to take the time myself to create a tag tutorial for the blog each month – thank you for that…
this month’s tag is pretty random, but it features one of my favorite techniques that i’ve been teaching all year in my class “heart & soul” and that’s also show in my book “a compendium of curiosities vol.II”. once you learn this one you’ll see for yourself how easy it is to alter the look of a surface and give it this cool industrial faux riveted metal look. let’s get to it…

supplies: craft sheet, metal foil tape sheets, alcohol inks/pitch black/ginger/stonewash, ink applicator tool, jet black archival ink, paint dabber/pitch black/silver, distress ink/vintage photo, wonder tape, craft scraper, #8 tag; grungeboard, paper stash/lost & found, mini gears, mini fasteners, mini numerals, pen nibs, type charms, film strip ribbon, wire pin, crinkle ribbon, tiny attacher, sanding grip; mini mover die vintage typewriter, base tray, vagabond; stamp cms#100; non-stick scissors, paper distresser, craft pick, craft knife; steel wool; retractable pen; hole punch
 step 1: start with surface of choice (in this case it’s a #8 tag) and a couple of sheets of metal foil tape.
 step 2: using non-stick scissors, cut metal foil tape into random shapes.
 step 3: remove paper backing from metal tape (be careful, tape will want to curl up).
 step 4: working on non-stick craft sheet, apply tape to surface of tag with some hanging off the edge to secure tag.
 step 5: continue layering pieces of metal foil tape slightly overlapping edges of previous pieces.
 step 6: repeat until entire surface is covered with tape.
 step 7: trim off excess tape from tag.
 step 8: punch hole back through top of tag.
 step 9: now it’s time to create some great texture effects on the metal tape. there are so many different gadgets and tools that can make some neat effects and our first “faux rivet” shows you just that. place a retractable pen on to seam of foil tape (with pen retracted).
 step 10: press the pen down into the foil tape using pressure to create an impression.
 step 11: while pen still pressed down on surface, press the button on the pen to extend the pen tip out, but it’s not necessary to click the pen all the way out.
 step 12: remove the pen and check it out – a ring with a dot in the middle…our “faux rivet”.
 step 13: continue making rivets along the seam of the metal foil tape creating as many as you want spacing them out as desired.
 step 14: another cool texture is using the corner of a craft scraper (or plastic credit card works fine too) and simply press the corner along the seam.
 step 15: this will create a stitching effect.
 step 16: our final texture will simply be piercing tiny holes through the tag using a craft pick. *tip: for smaller holes, simply extend the pick 2 clicks since my tonic craft pick is designed to increase in diameter the further you extend the pick. so the shorter the needle, the smaller the hole it will create – good to know huh?
 step 17: continue creating these various textures on to the raised seams of the metal foil tape.
 step 18: apply a piece of felt to the ink applicator tool and gather the following colors of alcohol ink/pitch black, stonewash, ginger.
 step 19: apply a generous amount of all 3 colors directly on to the felt ant one time side by side.
 step 20: tap inked tool directly over metal foil tape.
 step 21: continue inking until the surface becomes very dark and almost entirely black. *tip: you should allow each layer of ink to dry for a few seconds to build color intensity.
 step 22: allow surface to completely dry to the touch.
 step 23: using steel wool, burnish the inked surface in a circular motion removing the layers of alcohol ink and scuffing the metal.
 step 24: continue until desired look is achieved and wipe steel wool lint off with soft cloth or paper towel. *note: if you burnish off too much, not to worry…simply re-ink the entire tag and repeat the above steps.
 *that’s it! check out that cool industrial finish of faux riveted metal – love it…
(the next series of steps is really about embellishing the tag…)
 step 25: die cut grungeboard using the mini vintage typewriter die and base tray.
 step 26: place the cut typewriter on a cutting mat and using craft knife, cut the tabs to remove the space bar and carriage bar.
 step 27: paint the typewriter using black paint dabber, and paint the accessories removed using silver metallic paint dabber. let dry.
 step 28: scuff all painted pieces with sanding grip to expose some grungeboard.
 step 29: ink sanded pieces with distress ink using an ink blending tool.
 step 30: using mini quote, stamp on to paper with archival ink and ink edges with distress ink. tatter the edges with a paper distresser and cut the base of the strip at an angle to slide through typewriter.
 step 31: using existing slit, slide paper through typewriter and trim away excess.
 step 32: curl paper up and around typewriter to give it an authentic look – i even like to bend the corners a bit.
 step 33: apply a piece of wonder tape to the back of the typewriter to secure paper.
 step 34: tear a strip of dictionary paper from lost & found paper stash and ink edges with distress ink.
 step 35: apply a piece of wonder tape along the bottom area of tag.
 step 36: adhere dictionary paper and secure both edges to tag using tiny attacher.
 step 37: remove backing from tape on typewriter and secure that over the center of the dictionary paper. and apply a small square of wonder tape behind the stamped paper.
 step 38: remove tape backing and secure stamped paper to it to maintain the shape from coming around the typewriter.
 step 39: place film strip ribbon along edge of tag and secure with tiny attacher.
 step 40: secure mini numeral to tag using tiny attacher (since it’s aluminum you can staple right through it).
 step 41: adhere pen nib with wonder tape.
 step 42: adhere light bulb with wonder tape.
 step 43: create a type charm and attach it to a wire pin using a jump ring and secure to tag with crinkle ribbon.
 step 44: attach mini gears to tag using mini fasteners to finish.
 *the details: i love the look of the mini typewriter with “typed” saying coming out of it.
 *the details: here is the same technique on a paper mache heart we created in my “heart & soul” classes.
so there you have it – a simple yet effective way to alter just about anything giving it the look of industrial “faux riveted” metal. this technique could be applied to paper craft projects, jewelry, home decor, and everything in between. use it to alter a journal cover, create switch plate covers for your house, wrap a picture frame with it, or make a background with it for your next card. the possibilities are endless and i can’t wait to see what you come up with to use this technique on (be sure to post them to the inlinkz gallery here on the blog). time to get industrial…t!m
*be sure to check your local stores for these supplies or you can
click the links below to purchase online…
(SSS=simon says stamp / IE=inspiration emporium)
GREAT NEWS! both of these online stores are offering a discount of 10% off your purchase – use the following codes with your order:
(SSS code: SEPT12 / IE code: timtime)
|
|
|
|
|
|
|
|
|
|
|
|
|
|
|
|
|
|
|
|
|
|
|
|
|
|
|
|
|
|
|
|


