
it’s definitely feeling like fall here in northern arizona. with our recent trip to see the colorful foliage i definitely came back to the studio inspired for this month’s tag. i love the warm earthtone colors of fall, and what better palette of greens, rusts, yellows, and browns than distress? the technique i’ve used on this month’s tag is always one of my faves so let’s get started on the tag. be sure to check out the end of the post for our list of winners from the october tag…

supplies: distress inks/rusty hinge/mustard seed/broken china/crushed olive, distress stains/weathered wood/crushed olive/wild honey/scattered straw/fired brick/black soot/brushed corduroy, archival ink/jet black, distress embossing ink, clear embossing powder, glossy accents, mister, ink blending tool, heat tool, craft sheet, #8 manila tag; CMS116 thankful silhouettes, CMS125 mixed media, grid-blocks; kraft core; autumn gatherings die; wire pin, crinkle ribbon, paper string, jump ring, muse tokens, tiny attacher, sanding grip; paper distresser; craft iron
 step 1: ink wheat silhouette stamp with clear embossing ink and stamp on tag.
 step 2: cover stamped image with clear embossing powder.
 step 3: heat emboss image until melted clear.
 step 4: place silhouette words stamp on grid-block and apply masking tape to stamp above and below “thankful” word.
 step 5: ink “thankful” with archival ink.
 step 6: remove pieces of masking tape from stamp.
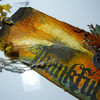
 step 7: stamp image on to tag along side of wheat – let air dry about 5 minutes.
 step 8: mist tag with water mister covering entirely with light layer.
 step 9: begin swiping distress stains over tag.
 step 10: repeat with various colors layering and blotting excess off with a towel.
 step 11: continue until entire tag is covered with color and desired look is achieved.
 step 12: place inked tag on to a piece of newsprint of thin kraft paper.
 step 13: fold paper over covering the top of the tag and iron over entire tag with a hot craft iron set on highest setting. *note: the iron i use is no longer available, but you could use an encaustic iron or simple household iron devoted to crafting for this step.
 step 14: iron until you begin to see your stamped image melt through the paper.
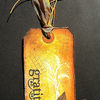
 step 15: while surface is still hot, peel back the top layer of paper. (basically we are remelting the embossing powder and removing it from the tag as it absorbs into the kraft paper) this creates an amazing resist. *note: if you didn’t remove all of the embossing powder the first time you ironed it, be sure to place a clean piece of paper over the surface to iron again to avoid transferring powder back to the tag.
 step 16: the tag should be dry at this point, if not simply heat dry with a heat tool before inking. ink tag with various colors of distress ink using an ink blending tool to add more layers of color.
 step 17: creating a warm brown shadow around the entire tag with an ink tool and distress ink will really make the colors of the tag come to life.
 step 18: spritz water in your hand and flick droplets of water over the inked tag.
 step 19: dry the water with a heat tool to create a splotchy water droplet effect.
 step 20: drag a paper distresser along the edges of the tag to tatter.
 step 21: ink mixed media background stamps with distress ink and bending and folding the stamps in your hand, stamp over background. by not mounting these stamps on a block it will allow for a more random background look. any ink that goes over the top of the wheat image can simply be wiped away since the remaining embossing powder is baked into the tag creating a permanent resist.
 step 22: stain a piece of crinkle ribbon with various colors of distress stains. crinkle into a ball, and dry with a heat tool.
 step 23: cut 2 pieces of paper string and ink with distress ink using ink blending tool. i love the ability to ink this string with ease.
 step 24: since this string is paper and not fibers, you can un-twist the strands to create very cool crimped paper strings.
 step 25: gather the strings and crinkle ribbon together.
 step 26: secure all of them through the top of the tag for a funky textured accent.
 step 27: die cut several pieces from the autumn gatherings die using kraft core and sand and ink to distress.
 step 28: apply glossy accents over the top of the acorn and let dry.
 step 29: cut a scrap of burlap or fabric and secure it to the tag using a tiny attacher.
 step 30: attach a muse token to a wire pin using a jump ring and secure it through the burlap.
 step 31: embellish by adhering the various die cut pieces to the burlap with glossy accents. let dry.
 *the details: i really like the dramatic contrast of using this faux batik embossed resist technique with colorful distress stains and ink.
hopefully you’ll give this technique a try, or play with it again – it has so may possibilities. i love the fall colors and i don’t think you can really go wrong with mixing up your own variety of colors. have fun with this one…t!m
thanks for continuing to “wow” me each and every month by uploading your tags and participating in the 12 tags challenge. congrats to winners from the october tags. if you see your name and it’s linked to your tag – please email your mailing info to mario@timholtz.com
1. donna gibson
2. fieneke
3. candy
4. anette
5. clare buswell
7. merete m
8. lorna moore
9. anna
10. sam 21ski
11. ste creazioni
12. danee kaplan
*be sure to check your local stores for these supplies or you can
click the links below to purchase online…
(SSS=simon says stamp / IE=inspiration emporium)
GREAT NEWS! both of these online stores are offering a discount of 10% off your purchase – use the following codes with your order:
(SSS code: 101112 / IE code: timtime)
|
|
|
|
|
|
|
|
|
|
|
|
|
|
|
|
|
|
|
|
|
|
|
|
|
|
|
|
UPLOAD YOUR PROJECT: here's the place to share your own project
inspired by this month's "12 tags of 2012" right here on my blog!
To Get Started:
1. click on the (add your link) button at the bottom of the post.
2. after you enter your info, click (next step) and you'll be able to
select the photo you wish to display.
*note: you may link from your blog or from a public hosting site.
please only post your project photo relating to this month's tag.
 |  |  |  |
 |  |  |  |
 |  |  |  |
 |  |  |  |
 |  |  |  |
 |  |  |  |
 |  |  |  |
 |  |  |  |
 |  |  |  |
 |  |  |  |
 |  |  |  |
 |  |  |  |
 |  |  |  |
 |  |  |  |
 |  |  |  |
 |  |  |  |
 |  |  |  |
 |  |  |  |
 |  |  |  |
 |  |  |  |
 |  |  |  |
 |  |  |  |
 |  |  |  |
 |  |  |  |
 |  |  |  |
 |  |  |  |
 |  |  |  |
 |  |  |  |
 |  |  |  |
 |  |  |  |
 |  |  |  |
 |  |  |  |
 |  |  |  |
 |  |  |  |
 |  |  |  |
 |  |  |  |
 |  |  |  |
 |  |  |  |
 |  |  |  |
 |  |  |  |


